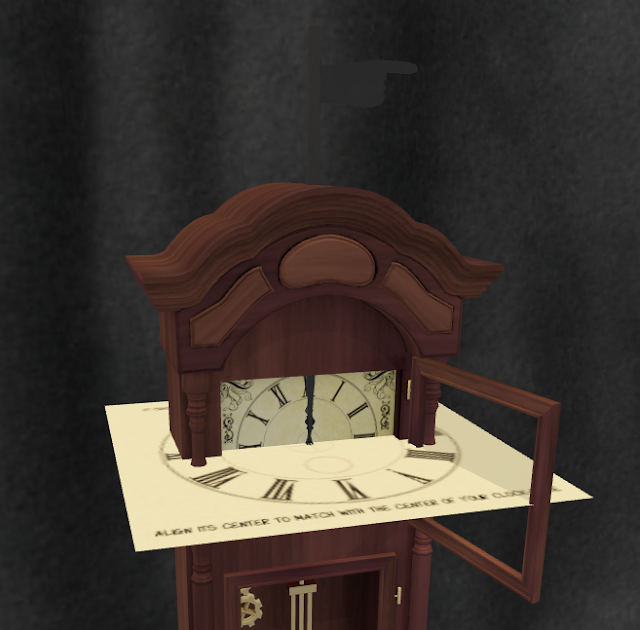
First, we have to distinguish two cases here:
- Hours, minutes and seconds hands will all rotate around the same axis: the three of them share the same center (Or just hours and minutes, if you don't want to use a seconds hand.)
- Hours and minutes hands rotate around the same axis, and the seconds hand rotates around a different axis (like we can see in some grandfather clocks, where the seconds hand is separate from the other two.)
Before proceeding, the first thing we have to make sure is that all hands are oriented at exactly 12 o'clock. We can see this through all the snapshots in this part of the documentation. All hands point to 12:00:00. This is quite an important step to do.
The second thing we have to check is that the hands are linked to the clock, and none of the hands is the root prim.
No matter which case we're treating, the hands need a specific description before any auxiliary tool is used on our clock.
Hours hand: Description is h
Minutes hand: Description is m
Seconds hand: Description is s
After these descriptions have been set, we proceed to use the auxiliary tool.
Case 1: Hours, minutes and seconds rotate around the same axis (or you just have hours and minutes)
Rez the [Black Tulip] Hours/mins Axis Configuration Tool object.
First, we have to position it exactly where the center of the hours hands is. If you have a viewer like Firestorm, the copy/paste buttons next to the position edit boxes will help. Otherwise, copy and paste one number at a time, until you get this tool placed at the rotating center of the hands:
IMPORTANT: If your hands don't rotate exactly around the center of the prim, then move the auxiliary tool to the point where your hands should rotate around.
Now, rotate this auxiliary tool, so it has the same orientation as the clock face:
If you want to move it a little further, that's okay, as long as the center still coincides with the center axis the hands rotate around:
Finally, all we have to do is editing our clock, not the auxiliary tool, and drop the following script in contents: [Black Tulip] Analog Clock - HANDS CFG (drop in CLOCK)
The script will perform some calculations, and self remove itself from the object, while giving a message in local (nearby) chat:
After this, we can check that the descriptions of our hands, have changed:
We're showing the changes only for hours and minutes hands. If you are also using a seconds hand, changes should be reflected there. From this moment, do not change the descriptions of those prims! That's the data the script needs to know, in order to know how to rotate our clock hands.
We can now delete the auxiliary tool. The hands are ready to work!
Case 2: Hours and minutes rotate around the same axis, seconds hand rotates around a separate axis
We would begin like in the previous case: rezzing the [Black Tulip] Hours/mins Axis Configuration Tool object, then placing it where the center of the hours and minutes hands are, rotating this auxiliary tool to match the same orientation than the clock face has, and moving it a little if we wish.
We don't drop any scripts yet. Now we rez the [Black Tulip] Seconds Axis Configuration Tool object, and place it where the center of the seconds hand is:
Then rotating it, so it matches the same orientation than the clock face has, and move it a little if we wish:
IMPORTANT: Like in the previous case, if your seconds hand doesn't rotate exactly around the center of the prim, then move the auxiliary tool to the point where your seconds hand would rotate around.
Now is when we edit our clock, not any of the auxiliary tools, and drop the following script in contents: [Black Tulip] Analog Clock - HANDS CFG (drop in CLOCK)
The script will perform some calculations, and self remove itself from the object, while giving a message in local (nearby) chat:
After this, we can check that the descriptions of our hands, have changed:
We can now delete the auxiliary tools. The hands are ready to work!
NOTE: If the auxiliary tool turns to be too big (or small) for you, simply click on it, and use the resizer script, to make it smaller, or bigger. Keep in mind that the auxiliary tool is mesh, so increasing its size will make for the LI to raise. At the maximum size, 32x32x64, this LI is 15. Make sure you have enough allowance in your parcel before scaling it up.
NOTE: If we need to setup our hands again, we have to make sure of doing this:
- Make our clock hands to AGAIN point to 12 o'clock.
- Restore the descriptions to h, m and s, as instructed above.


